-
Posts
4,098 -
Joined
-
Last visited
Content Type
Profiles
Forums
Events
Gallery
Store
Everything posted by skipper19
-
-
-
No one?..even looked at it? Took it off the shelf someplace and handled it ?:huh:?
-
Looking at this to replace the aged and not so easy to fix worn out Woodsman 742. I have done some research online and realize some small disadvantages of a compliant rifle, from reading reviews. Any one have some experience with the Ares? Thinking of it for a woods hunting auto to replace the 742 and some range time that would not be a worry as much as the old 742 in reliability. It has nearly expended it's service life but is a sentimental firearm my father owned since about 1969. Pretty..., but not a good reliable piece. Mark
-
Good post!..exactly what I had in mind with the short copper trick I started using recently. It's pretty close to the original depth of the downrigger weight. The down rigger is the most accurate way of knowing your first baits perceived depth, on screen and by counter. The copper is pretty consistent, and without the benefit of remote sensors, in a short 100 feet of duplication of the ball depth, when attached to a cable release on that downrigger 20 feet above the ball. It will be along the same path in 27 seconds at 2.5mph after the first bait passes on the downrigger. A couple of nice extras that run inside of dipsy and out of the way for most applications. The only thing is a fish from the downrigger lure can and sometimes does cross the copper before you can drop it quick to depths out of the way of harm. The screen of the fish finder is a help in locating fish in consistent patterns, it is a tool to get you started in the right column of water. You just have to know how to comand your spread effectively to exploit it to your advantage. Longer the lines, dipsey and long coppers, lead core, and bare mono, the less accurate control over the exploitation. There is what I can see an advantage to a depth sensor on the spread, long lines.
-

Who uses Outriggers on Lake O?
skipper19 replied to FleetTracker's topic in Questions About Trout & Salmon Trolling?
Most big store marine rigging supplies have them or can get them. They work the same for salt or fresh water. Just need to find a set that works for your size boat. They range from 15 foot to over 30 foot. The TACO brand that we talked about here, is a nice easy fit, mine 15 foot, FleetTracker has 18 foot, easy removal poles that can telescope out sections to full length. Most of these type are the 15 to 18 foot range. The longer they get the more truss and gusset sections are used for rigidity as on most larger boats of 30 feet or more. -

Who uses Outriggers on Lake O?
skipper19 replied to FleetTracker's topic in Questions About Trout & Salmon Trolling?
-
That's the best setup I've had for a "tailgun" second shot, only I use a 100 foot copper now, instead of the dipsey. I attach the copper backing in a Scotty cable release 15 to 20 feet above the ball. The lookers often at the ball will drop back as noted, and see the second offer as a feeding salmon (large flasher and fly) and might see the fly as a wounded miss. Also I believe fish that pod or school are greatly affected by the herd mentality. In essence if one is feeding, others will feed triggered by actions of the others as it developes into a frenzy type of feed. Competition on a single bait can trigger some of the most vicious strikes in most fish, hence the main purpose of the flasher.The copper flasher and fly, is running in direct line of the main rigger bait, a spoon, and it can find that same fish that followed and dropped back and trigger the strike on the fly or meat in competition with the flasher. One advantage of the copper flasher and fly, on the cable, is that it can be dropped quickly on the cable 50 or more feet when a fish strikes the spoon, to keep it out of the way, still running down deep. When the rigger fish comes to the boat the copper is pulled from the release and set in a rod holder, in order to let it run until the fish is in the cooler. Then the ball is brought up while the copper is running free, reset the ball rod and lower it back to 15 to 20 feet and reel up the now drifting copper to the backing connection, reset it on the cable, and send it all back down. The advantage of the copper drifting back there during all this time of netting, icing, and reseting, can grab another hit as it drifts up from the deep and runs free. Saves bringing in the last 100 feet to have to reset a dipsy. Yes it is a form of stacking lines on a downrigger, with some disadvantages in deployment of two rods on a rigger at once, but it is a very effective tailgun bait 100 feet behind the first offerings at the ball, and you can change the depth easily by setting higher or lower on the cable from the ball. The 100 copper will naturally run most baits about 20 to 22 feet deeper than the distance between the ball and the cable release set on the copper backing. Great strike inducer for what we find to be curious lookers, but it's still a pea sized brain we can't begin to understand, even though it is a prehistoric pattern that seems should be easy to figure out.:blink::blink::huh:... Mark
-

Who uses Outriggers on Lake O?
skipper19 replied to FleetTracker's topic in Questions About Trout & Salmon Trolling?
Yeah I know...my boat is kind of open on top..:unsure: The shop is vintage late 1800..there's trees for rafters in there. Someone skidded of the road and went through the side corner a year ago. It's pretty tough, but yeah, needs a roof all the way. Maybe cheaper to install a nice new garage with a door high enough to get inside with the boat and the KW....BRING YOUR NAIL GUN! -

Who uses Outriggers on Lake O?
skipper19 replied to FleetTracker's topic in Questions About Trout & Salmon Trolling?
You are very welcome! That's a nice addition that you will come to appreciate for convenience and fun! I have been thinking about new poles for mine that are 18 feet. Also would like to get the 380 mounts for the ease of elevation adjustments without the climb. After you get the poles mounted, be sure to figure the best places for anchoring the Bungee and roller for fishing and running as well. I have a couple places around the T top for running attachments depending on the height of my poles. I usually run at speed with them about like the picture of the boat in the driveway, and fish with them either flat out for dipsey or elevated for the coppers and long lines. I also have a spot on my bow rail that serves for anchoring the Bungee and roller to fish with. Most importantly I can think of one more thing about the fishing position and that is to be sure the rigging halyard is made the right length for easy access to your release without leaning out of the boat to reach it and also have enough tension on the Bungee to keep the halyard taught. You could fish with it anchored to the hard top, but it is a reach up, and your rigging is overhead which on a boat of your style with a cabin is not so bad, but on my center console it is in the way for forward movement with a rod in hand, and makes netting a fish difficult with a dipsy rig unless hand lining the leader in. The gunnel mount position is out of the way and does not interfere with most things.If you have never used a dipsey on a rigger, be sure to line it out above the water on the release and halyard. Like Les pointed out, run it over the arm of the blacks and keep the dipsey out of the water above the surface all the way out to the tip of the rigger pole, then drop it in the water and pay out your preferred counter distance set at zero while at the end of the rigger. If you drop the diver in before running it out you will have too much drag on the halyard to run it out. You just let the fishing line run over the arm of the blacks. Les was right on about the set of the release, and you just set your drag like normal just a little more than what will creep out of the reel. Turns will need some more drag as there is significantly more speed gain on the outside pole of the turn, and opposit that on the inside, nearly a stall, so a turn is a little more delicate with the dipsey rigs. I use Fireline fused original 30 lb to run over the blacks arm without trouble, and it is very flea resistant. -
-
My troll master has a plug in for the control head at the helm. It plugs into the bottom of it. Just pull it and take the control head inside the house for me. Be sure to run your wires under the cowl of the kicker away from ignition wires. It caused interference with mine. Moved the wires and no problem.
-
-
Wish I had a pic of my old vintage VW BUG. Floor was rotted out so I made it into a fishing bug. Flip open the hatch and drill a hole and fish. Let all my gear stay inside. Worked good on ramps and light snow under 6 inches. Snow would sometimes come into the floor hatch and collect in the back...defroster sucked though. Took a while to see where you were going! Lol.
-

Who uses Outriggers on Lake O?
skipper19 replied to FleetTracker's topic in Questions About Trout & Salmon Trolling?
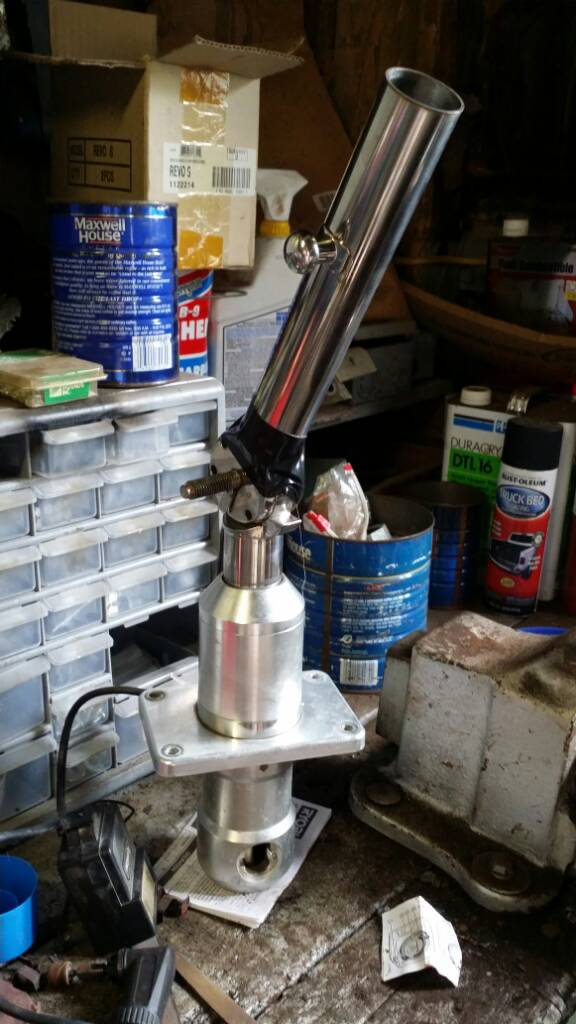
The 280 grand slam. I think the basically have the same tube for the base as the 380. The 380 is nice if you can't access the top side easily and safer too in rough water... no climbing the gunnels. Here's a pic of mine that broke...again though, I have a propensity for aerial flight for fun in rough water LOL! half the fun of getting there!I tapped it up for the welder to see the correct alignment. -

Who uses Outriggers on Lake O?
skipper19 replied to FleetTracker's topic in Questions About Trout & Salmon Trolling?
I've had the 15 foot TACO aluminum extention poles for several years now. There are some tips I can give you that will potentially avoid some troubles with the poles and I have had a problem with one of the mounts. First the poles have spring loaded snap out buttons that secure the extention sections in place. That can get misaligned inside the tubes, and are a bit ch to get them to align. Most times they are ok but this has happened on dark mornings and can cause some anxiety! I would lube the sliding parts often, however use something that doesn't wash out with water. In order to avoid trouble with all the extention sections, I only shrink up the first large section for transport on the road.The advantages of that are less to set up and less halyard line to secure up for travel. The only trouble with the mount I have was the tube that holds the base of the pole broke off at the weld. (ROUGH WATER AND HIGH SPEED CONSTANT VIBRATION)...:o It was clean break and easy to fix with a trip to my local welding shop. It is a stainless part. I have used them mostly for running coppers of any length. Some for getting a wide high dipsey out and run three a side on calm days. Most of all they are great for shallow water long lines in spring or high holding fish. I really never like fishing planner boards just because it's something extra to have to work with in the water. Can't beat maneuver with the outriggers. You can most times turn around pretty quickly to retrieve a stuck lure on the bottom. You can run the rigger high and back so the lines are out of the water far behind close sets off the down riggers avoiding tangles and netting fish. They do shine in rough water. I love them for long coppers and have the coppers marked every 100 feet with dental floss for attachment points to the blacks release. That way I can run the copper any length out I want. A 600 copper can be set on the floss at 100, 200, 300, 400 or all out on the backing. I like running 32 lb and 45 lb high angle, 11 feet off the surface and back even with stern at the same time and get 2 different planes of travel in the troll to help separation of them. If you like 60 lb copper you can run it in the chute off the stern. I don't recommend using wide dipsey sets with the coppers out the riggers though. A number 1 setting is fine most of the time but never a guarantee of a fish taking it outside the copper. 18 foot poles could be an advantage here? As for releases, I used the blacks, went to Aftco roller release, then back to blacks again. The roller releases worked fair, but they did not work for copper in direct contact as I would have liked. For dipsey on a wire I don't have any confidence either for the same reason. It breaks the copper eventually and even more so when in rough water. Dipsey on a braid is ok, but I didn't like the adjustable tension of the release, they are tough to guage. I didn't like the dexterity needed to set the line in it, and one of the releases broke loosing the wheel out of it. Back to blacks. The floss on the copper takes the abuse of the contact with the release and not the copper. No more problems with that. The dipsey just runs over the release arm on braid, not wire, and runs out fine that way. Halyard rigging is important. That kit that Taco sell is just ok...not good or best. The line doesn't last long, the Bungee roller is ok, but the whole thing seems cheap for the price. I used some parachute cord with good results, a bit heavy but works. An adjustable tarp style Bungee cord with the ball on one end really works good for different halyard anchor locations on the gunnel or top using a small loop bracket attached where convenient for your use. I have started looking at sailing cord for the halyard and think that is better than paracord but not yet evaluated it. There are some sailing cords that come in 1.8mm dyneema and seem strong and light enough to do some fishing. Colors too! If nothing else the riggers are cool to fly flags off of! However I always try to use them since they are there and they need some use to justify the expense, in my book. Some pics may help here and the floss idea is great! Just tie a D loop like your bow string would have for your arrow nock. It won't slip, and you can color it with permanent marker for different distances. I set my floss so when the release is closed on the floss, the copper is in the water surface at the exact length I want it trolling from the contact of the surface. 100 feet, plus the length to the release when 11 feet above the water on the end of the outrigger. Mark -
-
-

Invasive specie regulation - Comments?
skipper19 replied to LongLine's topic in Open Lake Discussion
I can think of only two ways any of the concerning invasives, bugs, disease, plants, all from oceans away, could have been averted to a degree. All of it comes back to us in this country first in excessive foreign trade...a political issue. Too much coming into ports to even begin to monitor for things the human eye can't see. Now they want to regulate the end user, as usual...us. The second way is what nobody would like, but works to a degree on a human impact level. Having dedicated vessels to specific water systems regulated by registration to a body of water. This is done at NYC water supply reservoirs. The boat stays there, cannot be moved from shore. It is registered for operating on that body of water only. In light of the fact that most lakes are affected, and only a few are not, as Cornelius has pointed out, it makes sense to have that kind of regulation for a few lakes that are presumably clean of invasive critters. It would not impact everyone, be easy to enforce, less waste of time for resources and court traffic. -

Invasive specie regulation - Comments?
skipper19 replied to LongLine's topic in Open Lake Discussion
None of it is gonna work... The human eye can't see pollen and invertibrates...microscopic crap that sticks to water foul. If there is no high pressure hot water wash then you can use cold water? :huh: The door was left open too long. It's too late. It's all everywhere. Oh well, I see a way for the state to make more money on something they forgot to manage a long time ago. -
I put a lot of kraken down too! Burrrp....a little less coke!
-
Gonna make some this coming week ready for holidays and playoff time snacks! Hi mountain seasonings has a brine that I used for a base called Alaska salmon brine. Package has a bear pictured on it. Cabela's has it and other places. Mix the brine with cold water like the directions say. Add a cup of brown sugar to it. Add a 1/2 cup of maple syrup. Stir it up real good so the sugar disolves. Slice the meat into pieces about 6 inches square and place it in the fridge over nite. Take the fish out of the brine. Do not rinse off just pat it with paper towel to dry a little. Then air dry the fish for a couple hours until it gets that sheen of a pellicle on it. Smoke with alder and apple mix at about 180 to 200 degrees. Important; baste the meat with warm maple syrup AND honey 50/50 mixture about 2 hours into the smoke and once again about 1 hour into the smoke. After four hours reduce the smoke and then just use heat for drying to desired level. I test internal temp of meat for 135 to 145 degrees. Too much more and you get salmon jerky. Slow smoke temp, even 165 is ok. Just longer but don't do more than 4 hours smoke. Finish with heat. Electric smokers are good for this, or if you have a wood fire smoker finish in an oven on bake low low heat 165 to 200. I like to take my salmon off when it gets that translucent look to it. You can look at it and see light glowing in the meat appearance. The meat will flake apart like potato chips when done, but not crispy!..just a nice pliable flake of salmon goodness. Hold it up to light and see the glow in it and it is done. Eat a piece and you will not stop. Just like Lay's...you can't eat just one! Mark
-


